

Digital Environments Project 2
- Blake Hennigan

- Sep 26, 2019
- 11 min read
Updated: Oct 2, 2019
For the second project in digital environments, we were tasked with choosing an animated scene, whether that be 2D or 3D, and digitally recreating it. The project would be split up among 5 members, (Blake Hennigan, Sarah Hornik, Sam Land, Colin Lantz and Joseph Brown), and would be animated with the addition of at least one visual effect. The animated movie we ended up deciding on was Pinocchio (1940).


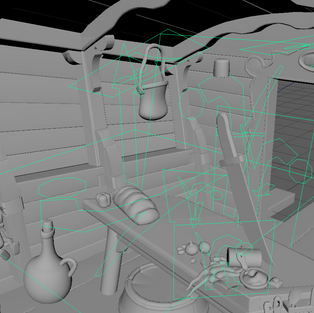
One particular pitfall with working from a 2D scene and trying to recreate in 3D is perspective matching. The immediate challenge for us to work with was that the perspective of the wagon is off, the walls and ground are incredibly skewed. One solution was to change the camera focal length, but test rendering out showed us our props would become off. One solution Sam came up with was to match the environment with a forced perspective.


Modeling
Member Contributions
- Sam modeled the table, cloth, umbrella, walls, roof, doorframe, and door.
- Blake modeled the stove, puppets in the foreground (along with a forced depth of field effect,) percolator, light fixture, ground bottle, and assorted puppets to be placed on the ledges of the wall.
- Sarah modeled all the food on the table, the ale bottle, the cage in the foreground, the pipe, and the bag on the wall. She also aided Joe in set dressing the gold pieces.
- Joe modeled the gold piece, barrel, teapot, and the puppet and chest combo.
- Colin modeled the table utensils, floor, and the arch ribbing.
Sam
- Table
- The table was constructed with multiple rounded cubes, as the main issue we found with this scene was the need for objects to be pushed and stretched to match the forced perspective.
- To give the table the right amount of rounded edges, a varying amount of bevelling and subdivisions were used.
- Cloth
- The cloth was constructed by creating a basic cube shape out of an extruded face from the chest, and then edge loops were placed around every fold. The faces for each fold were then extruded.
- To maintain roundness, beveling was used on hard corners.
- Umbrella
- The umbrella was harder, I tried a planer approach but I didn’t feel this gave it enough thickness.
- The umbrella was harder, I tried a planer approach but I didn’t feel this gave it enough thickness.
- Walls
- The walls were constructed plank by plank with beveled cubes, with small changes in size and bevelling to make it less uniform.
- The walls were constructed plank by plank with beveled cubes, with small changes in size and bevelling to make it less uniform.
- For the roof, basic planks were put together and then deformed with an (INSERT DEFORMATION HERE) to create the curve.
- Door and Doorframe
- One half was created with a large cube with multiple edge loops. Each vertex was pulled out to match the shape.
- The inner and outer rim of each door was extruded and thickened, with added bevel, to create depth and interest.
- The door frame was constructed out of three planks, with the tops being edited to have a wavy wood effect.

Sarah
- Ale
- I began by using NURBS to create a vertical cross-section of the bottle then revolved the curve to create a 3D surface. Then the NURBS was converted to polys
- Using the curve tool created a series of radiating rings (top view) to make the rope. Then In the side view, selected each ring section and moved them into a spiral stretching the body of the bottle. From there the curve fit the general shape of the bottle and curve points were adjusted to fit around the ale bottle’s surface.
- Two planar faces were then created and extruded around the curve, the twist modifier was adjusted to a high number, creating the rope.


- Cage
- The cage base is made out of a smoothed cube (to maintain quads). The sides and rings are cylinders and toruses respectively.
- The get the cage in the right place the mesh was overlayed on top of the reference image and the perspective was based on the final rendered camera.
- Bread
- Began with a rectangle with eleven subdivisions along the width.
- Smoothed and shaped into a loaf shape.
- For the “slices” the faces were selected and extruded inward, edge loops were then added to these faces so that when the object was in smooth mode the slices would be prominent.

- Food
- The food items all began with a cube and its faces were extruded to create each individual shape.
- The butter in the butter dish in a plane with about twenty subdivisions on each side. Using the foam tool in the sculpting menu the faces were sculpted into the shape seen in the movie reference.
- For the slight bump on the onion skin, every other edge was selected and scaled outward.
- For the carrot the shape was modeled in perspective view then the points were rotated in the final rendered camera view to match the exact way the carrots overhang the table in the movie.

- Pipe and Bag
- The pipe was a simple cylinder that was lined up in the rendered view. The points were then rotated to create the bend and the ledge was extruded.
- The bad was made from a cube that sides were extruded outward and the again upward to match the bag shape.

Joe
- Barrel
- Began with a standard cylinder and inserted edge loops to create the structures that wrap around the barrel.
- To create the sense of separate planks, more edge loops were added and the seams of where the wood were created.
- The hole proved tricky as it had to force it into place with several edge loops and extrusions.
- Barrel did not have to be altered that much, only had to squish it a bit to have it fit underneath the table.

- Teapot
- Started with a basic square and just modeled around the reference that was provided
- The little plane changes near the snout were created in a similar way to the barrel. I was not worried about them too much since it would be hidden by shadow, still tried to keep it as close to reference as possible
- Only major change needed was the snout needed to be raised in order to accommodate for the perspective

- Coins
- Simplest model in the whole scene
- Used a basic cylinder and just scaled it down to disk size.
- I noticed that in close up shots the coins had a bit of an indention on the inside so I tried to replicate it on top
- I did not do the set dressing of the coins, that was done by Sarah as I was struggling to work with the puppet, chest and cloth combo.

- Puppet & Chest combo
- Originally was designated to do all of the chest group, but ended up just doing the puppet and chest.
- The chest started off as a basic cube and modeled as close as possible to the source
- The handles are modeled into the chest itself, since in the reference they do not really extrude at all.
- The puppet is entirely made of cubes. Either smoothed or just regular cubes that were positioned to replicate the reference.
- Tackled the puppet like a character model, breaking it into pieces and then combining them all into a single mesh, so texturing it wouldn’t be a nightmare
- Grouped these models together to keep positions and placement.

Blake
Stove
- Began with modeling the stove, and started with a low poly sphere, then extruded faces and shaped them to get the neck of the object. Modeling from the reference, I tried to match the asset from the camera as much as possible


Percolator
- With the percolator I used NURBS to match the shape and converted to polygons. Learning NURBS made this modeling process soo much easier, as opposed to traditional box modeling.


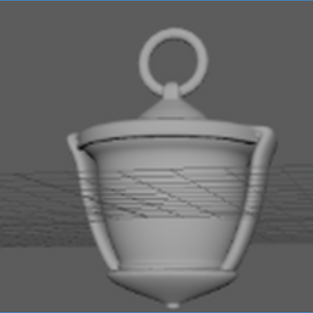
Lighting Fixture
- the light fixture also utilized drawing curves and NURBS for the glass portion, but the outside frame of the fixture is just box modeling, and extruding out. the upper chain is just a distorted torus. The inside candle is just a cylinder model, shaped out, with a wick inserted, (box modeling)

Puppets
-The puppets were my most challenging asset, mainly due to the lack of reference. In order to get the basic shape I had to take some liberties to match the scene. I ended up getting the depth of field working and that's when they really came together as an asset, acting as a vignette around the scene.


Wine Bottle
- The wine bottle, like some of my other assets, utilized drawing curves and extruding out surfaces. The first NURBS project might have been a hassle, but it helped me a lot for this second project in creating a lot of my assets.


Colin
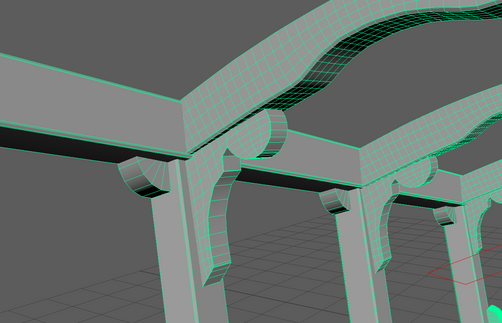
Wooden Arches
-Began the model by placing cubes at each major beam on the left side of the image. After adjusting the beam to size I began to add subdivisions where necessary to get the level-of-detail required.
-Once blocked in I selected the individual posts and reflected them across the scene.
-Due to my initial block-in with basic shapes, I had to retopologize the ornate bracing piece so that the texture would apply properly and not be pinched towards the center.
-Once completed I brought the arches into the full scene file and found that it didn’t match at all. The original artists who drew this frame unfortunately did not draw the room architecturally accurately and so I had to adjust each individual beam to match the sizing and the perspective of the scene.
-As in real life there are no harsh 90 degree edges in the beams as to look wooden and weathered by time.


Floor Planks
-Looking at the original screenshot I counted five floor planks to the center of the image. Thus I placed ten polygon rectangles on the floor of the scene and matched them to the width of the walls.
-Paying close attention I noticed that the wood had gaps between the boards. This wagon was not made by a modern day machine and has imperfections. To accurately represent this I added edge loops onto the planks, adjusting the position of different vertices to create this imperfect look.


-I additionally used the grab tool to bulge the mesh in certain places to increase the models accuracy to the original image.
Knife
-The knife stands out as one of the most prominent items in the image. The unique thing about it is that it was animated in with the characters and thus is created very differently to the other items in the scene. It lacks shadows, is painted with flat color, and is faintly outlined.


-Modeling the knife I flattened and stretched a cube much like a blacksmith would flatten and stretch a piece of steel for a blade. I added subdivisions, brought the blade edges closer together, and pulled back the blade point to achieve the curved look.
Next I added the blade guard. Again it is a cube that had been augmented to fit the rounded shape of the drawing. The last part modeled of the knife was the handle which is also a cube that had been beveled and curved to mimic the reference.
Spoons
-The spoons get their origins in a cube. One that had been flattened and the center points brought lower than the edge point to create the spoons signature concave look.
Adding subdivisions, I brought in the corner edges to round out the spoon. I extruded the bottom edge faces to create the handle. Flaring out the end to match the artwork.


Cleaver
-The cleaver is unique in that it just looks kookie. I used the same process of creating the blade as I did with the larger knife but formatted it to the shape of the cleaver.
-The handle is a separate rectangle that I added edge loops on to create a face in the center for the hole. After deleting the faces I used the bridge tool to unite the back mesh and the front mesh.
Surfacing and Texturing (Substance Painter)
Sam
- Since the assets I modeled were very artistically driven, I did all my textures in Substance Painter to have the most control
- Used Substance painter and drew based on the reference. It’s a half and half mix of some painted in shadows and also allowing the lighting to do the rest.
- For the wood specifically, I used more brushes like the dirt brush to make the texture more gritty and old looking. Otherwise, I used a hard round brush with differing opacity.


Sarah
- Using Substance Painter, painted each object in the painterly style of the movie. Mainly a hard brush was used with varying opacities so that the paint looked “layered.”


Joe
- Used Substance Painter, tried to replicate that rough paint look
- Used Substance Painter, used some default materials as a base and tried my best to turn that material into a painterly like style.
- Coins four different textures to allow for variation, however most of this was done in Maya it self to change the hue, saturation, and luminosity of several coins.


Blake
-For texturing, we went with a stylized look, trying to emulate the texture and paint of the 2D Scene.
-This was my first time attempting "Stylized" texturing, and was a fun challenge to match the reference image.
-For texturing I used substance painter with different layers with opacity.
-To get the texture, used brushes in substance, with roughness on the model set to 1.
- Blocking in large values of color first then working on the details.


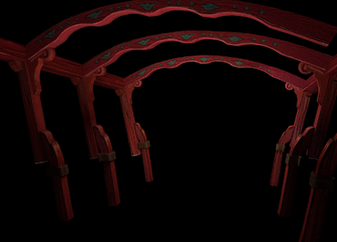
Colin
-Using Photoshop gave me the ability to layer and blend colors to create accurate textures.
Each piece of wood used its own texture was carefully painted to match the scene.
-For the knife I took creative liberties adding a wood grain texture to the handle, a brushed metal look to the blade guard, and a slight color difference on the blade to indicate its sharpened edge. My goal was to increase the interest of the object while staying as true to the original image as possible.


Lighting
Colin
Steps Taken:
-The lighting process was tricky as the original artists drawing didn’t follow the rules of physics. In the scene we see only one light source, a single candle, yet the scene is very well lit. So I started by placing one light in the scene and found that it was far too dark and scaling it up or increasing the intensity only blew out whatever object was close to it.
I placed the light facing the floor and placed it at the height of the candle. I placed a second light directly under the first on and faced it towards the ceiling as to light it up. Then I brought in a large fill light and placed it behind the viewer to increase intrigue in the shadows.


This setup still didn’t quite look like the original image though. There was still not enough light in the little room. So I took the top light and duplicated it, moving the original light towards the left wall and brought the new light towards the right wall.
I then placed another light behind the table facing the wall as to light it as evenly as possible. One more light was required to lighten the wall to the right of the image and some of the objects around it.
A few objects were either being cut through by certain lights or being washed out so in the light linker I removed those certain lights influence on the objects.


Rendering/FX/Compositing
- Blake, Sarah, Sam
- Used TAMU Pipeline and Renderfarm.
- Sam put models and textures (with texture aid of those who worked on them) into the pipeline for rendering
- Lots and Lots of trouble shooting and knit-picking final details, to get the overall saturation and contrast to match the final render.
-For FX work, we ended up doing two environmental effects. One of them being the candle flame, and the other being the rain effect.
-Blake created both of these in Houdini, first with the candle by specifying a sphere source, and tweaking the settings on the pyro solver. The main thing to achieving the success of the effect, was changing the pyro shader to more realistic values.
- for the rain, Blake set up a particle system in Houdini with gravity and wind forces, collision, shaded with the water shader, and composited in After Effects with a painted backdrop.
Compositing
Finally after compositing in the depth of field and getting the parallax on the puppets, we have our rendered out, five second, animated scene. the effects and compositing was done in Adobe Premiere and After Effects. The scene is 30 fps and has audio, done by Colin, using freesound.org.
FINAL RENDER


It was challenging doing a 2D scene and translating it to 3D, especially the perspective, but in the end we got our scene to match, and maintained a consistency in the style of the assets.


Comments